


Colour curves are one of the more fascinating tools in the photo editing arsenal. They did not take years and years of development work in order to only recently be implemented in the newest and most expensive version of Photoshop, nor do they require complex “intelligent” algorithms and a fast processor to function, yet they can dramatically influence an image’s mood and even fix various errors.
Colour Curves are responsible for the large part of the looks present in some of the most succesful film stock on the market, some of which are still preferred by photographers today, in spite of the customizability that digital technology is offering. The very colour palette of your image is at your fingertips and even some of the most inexpensive, or even oldest, editing software variants have it built in.
In the following workshop I am going to share with you some of my very own favourite uses of Colour Curves and explain why they reinforce my strong conviction that the best way to improve an image is still the smart and minimal use of the right tool for the right job.
How I met Colour Curves:
My first brush with the curves adjustment tool was way back in 2009 when I stumbled upon it when it was featured as a replacement for the Levels tool in a Photography article I was reading. The article was praising the curves tool as offering a lot more control over the effect and how it was worlds superior to the Levels control, so I thought I’d give it a try.
To be honest I was not particularly impressed at first. Yes, I was able to influence speciffic areas of the lightness spectrum, and I did notice that the tool allows the manipulation of individual colour channels, but I couldn’t think of a situation in which I would truly make better use of it than the levels tool.
It has been a long time until I found a use for the tool that would warrant using it rather than a dedicated slider. Editing my images in RAW has been the beginning of this. The colour curve in RAW allowed me to add much needed contrast to the image, while at the same time boost the shadows if the contrast took away too much detail in them; not to mention the recovery of highlights that didn’t need to be overly bright. In short, I was able to not only increase the contrast, but more or less control which areas of the images took advantage of it and which would be spared. To this day I see that habit as being responsible for a huge improvement in my photography.
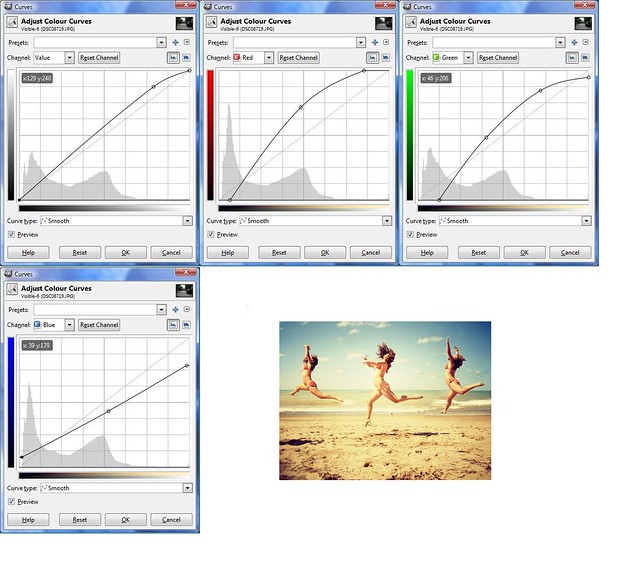
But it was only later yet, when I stumbled upon fellow photographer, Rowena’s photography that curves started to impress me. In her Flicker gallery she displayed a few of the Colour curves that she used to tone her images, and although I was not able to manage to replicate her look, I began to understand why people online were so excited about this tool.

From that point on, my progress with colour curves was slow, but due to the right tutorials and an ungodly amount of time spent experiementing trial-and-error style, colour curves really grew on me.
So here we are, talking about them and hopefully causing a whole lot of people’s images to suffer a radical improvement. I always find it enjoyable to support the underdog, and this tool really is one of the underdogs of photography, at least with the younger crowd, who would rather use the liquify tool all day (if only it could eliminate the actual photographing part altogether as well).
I hope to see many of you make it out to the workshop. As usual you get to see the details on the poster below. Feel free to share it on social media and tag anybody you think would find it useful.
[more details to follow]